
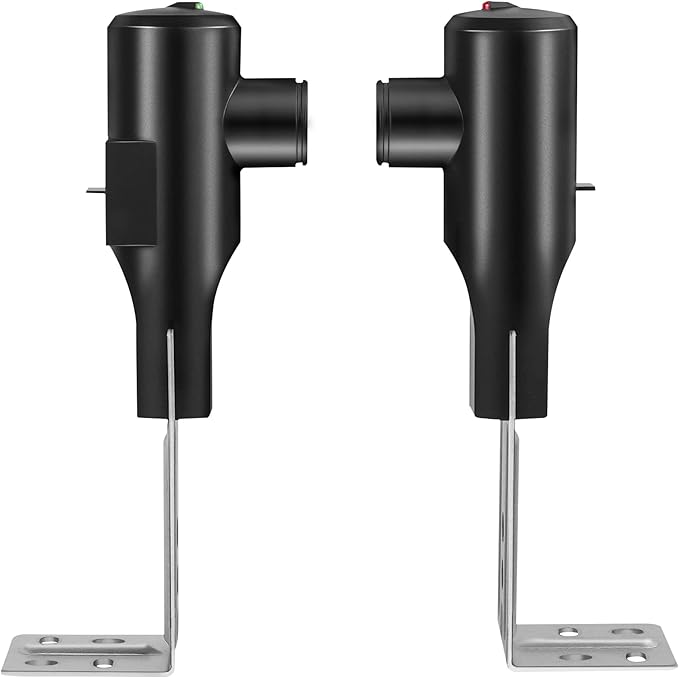
Upgrade 41A5034 Garage Door Safety Sensor Replacement for Chamberlain LiftMaster Craftsman Openers Made After 1997, Replace G801CB-P, 801CB,
- Incompatible ,, The garage door sensor is not compatible with older Chamberlain/LiftMaster/Craftsman openers Made Before 1997. It is not compatible with brands outside the Chamberlain system, such as Genie, Linear, Allis
- Compatibility ,, The garage door sensors is only compatible with 1997+ openers manufactured by Chamberlain Liftmaster Craftsman. Replaces 820CB , G801CB-P, 2610459, 012381050345, 041A5034, 801CB, 41A5266-1, 041-0136 perf
- Infrared Safety Detection ,, Equipped with high-precision infrared technology, the 41A5034 garage door eyes sensors detects obstructions and prevents garage door accidents. (Tips: No existing sensor system means this par
- Package List ,, Comes with 1 user manual, 1 sending sensor, 1 receiving sensor, 7 wire connectors, 3 wing nuts, and 3 pieces of 1/4-20 inch round head bolts. Each sensor features 19.68 inches wire. (Note: the maximum dis
- Easy to Install ,, Refer to the user manual to finish setup and installation in minutes. Always disconnect power to the garage door opener before installing garage door sensors replacement. If the garage door opener sens

Garage Door Sensors, Replacement for Genie/Overhead Garage Door sensors, GSTB-R STB-BL Garage Sensor for Genie Garage Door Openers Manufactu
- GSTB-R STB-BL Garage door sensor compatible with genie 7155 stealth drive connect garage door opener, Genie 2055 QuietLift 550 Garage Door Opener, genie signature series screw-drive garage door opener, genie wall-mount s
- Why choose our garage door sensor? When your family members or pets accidentally approach the garage door as it is descending, ordinary sensors may react slowly. However, our patented safety beam can trigger the "emergen
- high quality materials: The garage door safety sensor is made of high-strength ABS engineering plastic, which possesses shock resistance and anti-aging properties. Each sensor has undergone strict waterproof, dustproof a
- Installation and inspection steps for garage doors: First, the power supply needs to be cut off. Determine the installation position of the sensor and ensure that the sensor height is uniform. The probe must be directly
- Shopping with no worries: Please note that this product does not come with an installation bracket. If you need a matching bracket, please purchase the "Sensor + Bracket Set". Avoid the situation where the product cannot
Garage Door Sensors for Genie/Overhead, Garage Door Sensor GSTB-R STB-BL Compatible with Genie/Overhead Garage Door Opener Made After 1993,
- Universal Compatibility: GSTB-R STB-BL Replacement for genie garage door sensors, Compatible with all garage door openers manufactured by genie after 1993.
- Easy to Install and Program:garage door sensors Kit with Brackets . A detailed user manual is included to help you get set up and install in minutes. TIPS: Be sure power is NOT connected to the garage door opener BEFORE
- Updated Design: garage door sensors emits an invisible beam of light on the inside of the garage door, whenever there is an obstacle, the garage door automatically reverses before causing any damage to prevent accidents.
- Package Includes: Detailed installation manual *1, Sending sensor *1(with a red LED), Receiving sensor *1 (with a green LED), Wingnut *4 and round head bolt *4.
- high quality After-sales Service: Our products provide a one-year warranty service, no matter for any reason you are not satisfied, please write to us, we will provide you with timely service. Note: Accessories are compa
Your garage door stops closing, reverses without warning, or the opener's light blinks ten times rapidly. These are classic signs of misaligned safety sensors, a common issue that prevents your garage door from operating safely. Learning how to align garage door sensors is a simple fix that often takes just a few minutes and requires no special tools. This guide details the process step by step, helping you get your garage door operating safely again in 2026.
Many homeowners face the frustration of a garage door that refuses to close, especially when they are in a hurry. While there can be several reasons for a malfunctioning garage door, misaligned safety sensors are among the most frequent culprits, yet also one of the easiest to diagnose and repair yourself. You'll quickly discover how to realign garage door sensors and restore full functionality.
Understanding Your Garage Door Safety Sensors
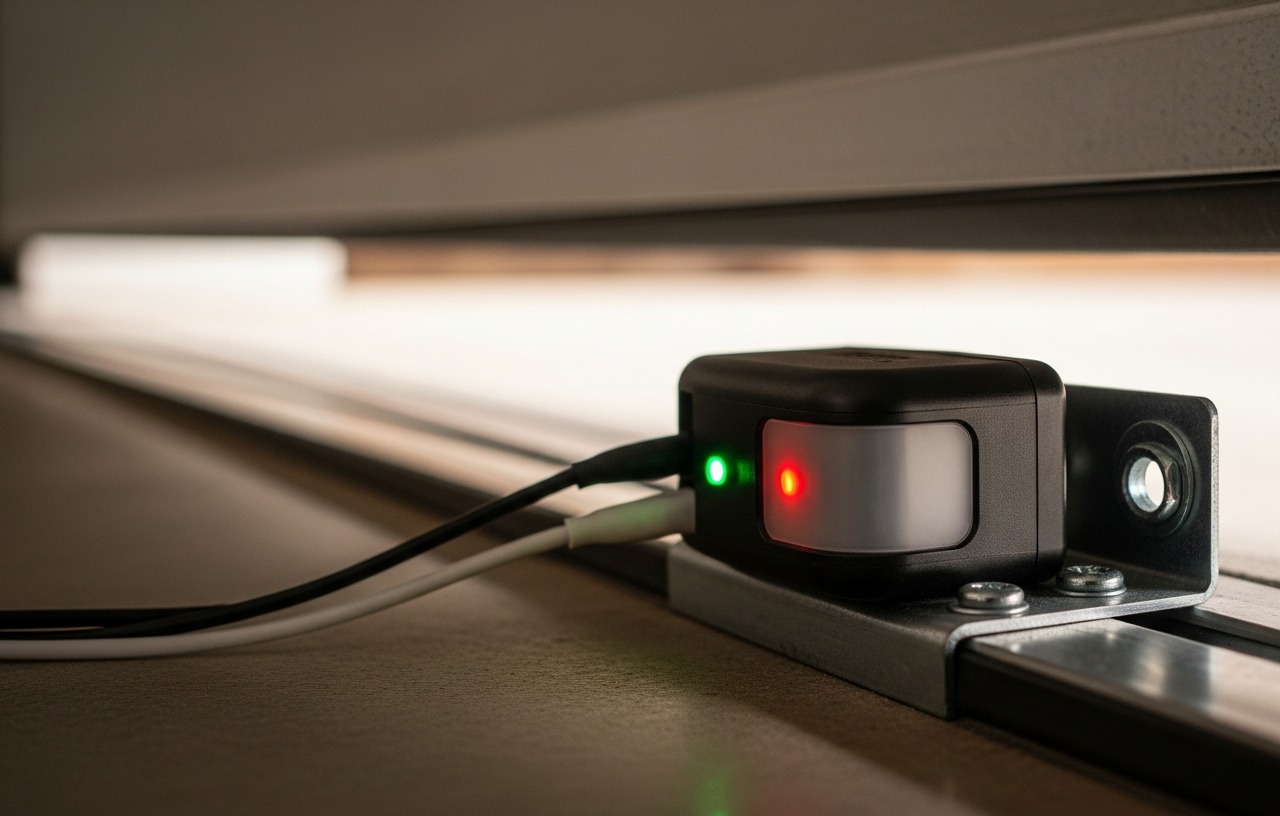
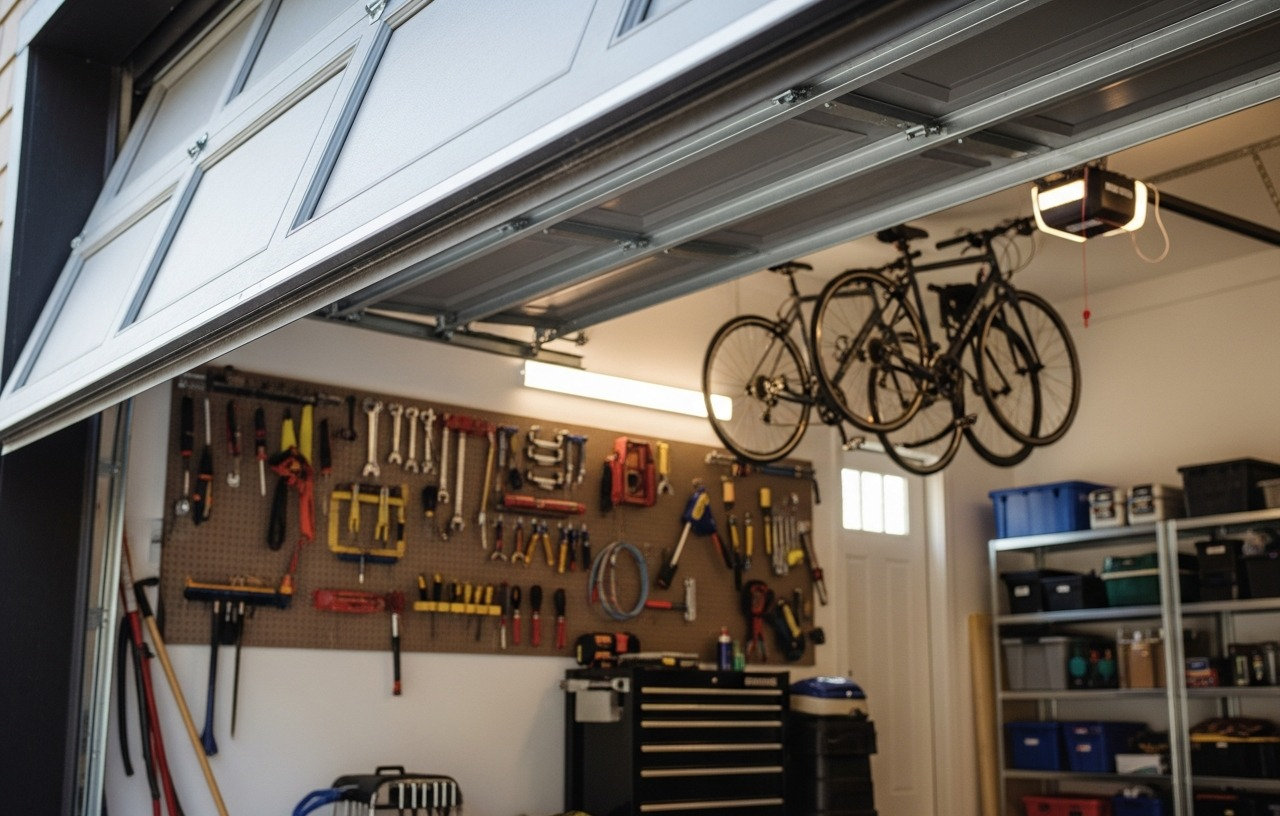
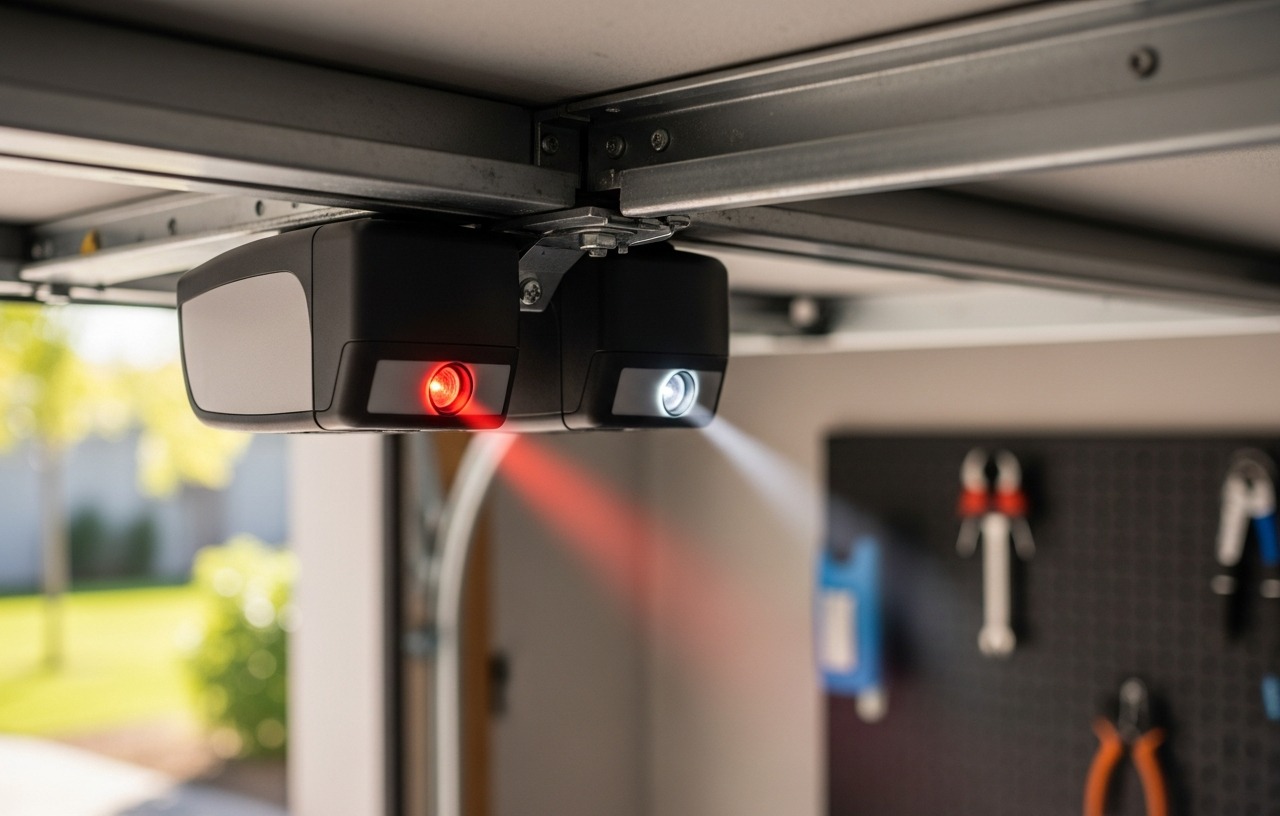
Garage door safety sensors, often called photo eyes, are small, electronic devices mounted on each side of your garage door opening, typically 4-6 inches above the floor. They work by emitting an invisible infrared beam across the garage door opening. If this beam is interrupted while the door is closing, the opener automatically reverses the door's direction, preventing potential injury or damage to objects, people, or pets caught in the door's path.
Federal regulations mandate these safety features on all garage door openers manufactured after 1993, making them a crucial component of your garage's safety system. If these sensors are not properly lined up, they cannot detect obstructions, and your garage door opener will not allow the door to close fully for safety reasons.
Common Signs of Misaligned Garage Door Sensors
Recognizing the symptoms of misaligned sensors is the first step toward fixing the problem. Here are the most common indicators:
- Garage Door Reverses: The door starts to close, gets a few inches or feet down, and then immediately reverses and opens fully.
- Garage Door Won't Close: The door refuses to move down at all, often accompanied by a rapid blinking light on your garage door opener motor unit (typically 10 flashes).
- Blinking Sensor Lights: One or both of your sensor lights are blinking. A solid light usually indicates proper alignment, while a blinking light signals a problem, most often misalignment or an obstruction.
- Remote Control Issues: Your remote control or wall button may seem unresponsive, but the problem lies with the safety mechanism, not the controller itself.
If you're experiencing any of these issues, there's a good chance you simply need to adjust garage door sensor alignment.
What You'll Need to Align Garage Door Sensors
The beauty of this common fix is its simplicity. In most cases, you won't need any tools at all. You might find a soft, dry cloth helpful for cleaning the sensor lenses, but that's usually the extent of it.
step by step Guide: How to Align Garage Door Sensors
Ready to get your garage door working again? Follow these steps to line up garage door sensors quickly and effectively.
1. Locate Your Garage Door Sensors
Look for the small boxes mounted on either side of your garage door track, close to the floor. There will be two sensors: a sending unit and a receiving unit. One sensor will typically have a green indicator light (the sender) and the other a yellow or orange indicator light (the receiver). The green light should always be on, indicating it's sending the beam. The yellow/orange light needs to be on and solid (not blinking) to confirm it's receiving the beam.
2. Check for Obstructions
Before you start adjusting, perform a quick visual inspection. Even a small obstruction can break the infrared beam. Look for:
- Spiderwebs
- Leaves or other debris
- Small toys
- Garden tools or garbage cans
- Snow or ice (especially in colder climates)
Clear any obstructions you find. Sometimes, this is all it takes to fix the problem.
3. Clean the Sensor Lenses
Dust, dirt, or even smudges can obscure the sensor's lens, preventing the beam from being properly transmitted or received. Gently wipe the lens on both sensors with a soft, dry cloth. Avoid using harsh chemicals or abrasive materials, which could scratch the lens.
4. Inspect the Wiring
While sensor alignment is the most common issue, damaged wiring can also mimic the symptoms. Briefly examine the wires running from each sensor back to your garage door opener motor. Look for:
- Frayed or exposed wires
- Loose connections at the sensor bracket
- Wires that have been chewed by pests (e.g., mice, squirrels)
- Wires that are pinched or cut
If you find damaged wiring, it will need to be repaired or replaced. This is a more involved fix, but often still DIY-friendly if you're comfortable with basic electrical work. For more general issues, you might find help in our guide, Garage Door Opener Not Working: 9 Fixes Before You Call Anyone.
5. Adjust and Line Up Garage Door Sensors
This is where you directly address how to align garage door sensors. The goal is to get both indicator lights (green and yellow/orange) to glow solid, without blinking.
- Identify the Problem Sensor: If the green light is solid but the yellow/orange light is blinking or off, the receiving sensor is misaligned, or something is blocking its view. If both are off or blinking, both might be out of whack, or the sender isn't sending a strong enough beam. Focus on the blinking light first.
- Gentle Adjustments: Each sensor is typically held in place by a bracket. You can often gently push or pull the sensor itself, or loosen a wing nut or screw on the bracket to allow for more movement.
- Focus on the Receiver (Yellow/Orange Light): While looking at the yellow/orange light, slowly and incrementally move the receiving sensor. You might need to move it up, down, left, or right, or even angle it slightly.
- Observe the Light: As you adjust, watch the yellow/orange light. When it turns solid, you've found the sweet spot.
- Tighten the Bracket: Once the light is solid, carefully tighten any screws or nuts on the bracket to secure the sensor in its new position. Be gentle to avoid knocking it out of alignment again.
- Check the Sender (Green Light): The green light on the sending unit should remain solid throughout this process. If it's blinking, that sensor may also need adjustment, or the issue is with its wiring.
"Many homeowners find their garage door acting up and immediately assume a major problem, when often it's just a quick sensor adjustment," says Gary Stanton, a lead technician at Dependable Door Services in Denver. "It's a simple diagnostic step everyone should know to get their door working again."
6. Test the Alignment
With both sensor lights solid, it's time to test. Press your garage door opener's close button. The door should now close smoothly. To confirm the safety feature is working, open the door again, then try to close it while placing your foot or a small object in the path of the beam. The door should stop and reverse immediately. If it does, you've successfully learned how do you align garage door sensors!
If the door still reverses or won't close, you might need to repeat the alignment process, making even finer adjustments. Sometimes, sunlight directly hitting a sensor can also interfere; try shading the sensor with your hand during testing to see if that helps.
Troubleshooting Tips Beyond Alignment
What if you've tried everything to line up garage door sensors, and they still aren't working? Here are a few additional troubleshooting steps:
- Sunlight Interference: Direct sunlight can sometimes overpower the infrared beam, especially if it hits the receiving sensor at a certain angle. Try creating a small shield (like a piece of cardboard) around the sensor to block direct sunlight.
- Bent Brackets: The metal brackets holding the sensors can become bent or damaged, making proper alignment difficult or impossible. If the bracket is severely bent, it may need to be straightened or replaced.
- Faulty Sensors: Over time, sensors can simply wear out or become internally damaged. If the lights never come on, even with power to the opener, or if they remain unresponsive after thorough cleaning and alignment attempts, the sensors themselves might be faulty. For more detailed troubleshooting, refer to Garage Door Sensor Not Working? Align and Fix It in 10 Minutes.
- Opener Logic Board Issues: In rare cases, the issue might stem from the garage door opener's logic board, which processes the sensor signals. If you've exhausted all other possibilities, this might be a deeper problem requiring professional diagnosis.
When to Replace Your Garage Door Sensors
If you've tried all the alignment and troubleshooting steps and your garage door sensors still aren't functioning, it's likely time for a replacement. Here's when to consider new sensors:
- Physical Damage: If sensors are cracked, broken, or the lenses are severely scratched.
- No Indicator Lights: Even after checking power and wiring, if neither sensor light illuminates, they are likely dead.
- Persistent Malfunctions: If you constantly have to realign garage door sensors, or if they work intermittently, new sensors will provide more reliable operation.
Choosing the Right Replacement Sensors in 2026
It's crucial to select sensors that are compatible with your specific garage door opener brand and model. Here are some top picks:
For Chamberlain, LiftMaster, and Craftsman Openers:
If your opener was manufactured after 1997, the Upgrade 41A5034 Garage Door Safety Sensor Replacement is an excellent choice. This sensor set is designed for Chamberlain, LiftMaster, and Craftsman openers, replacing models like 820CB, G801CB-P, and 41A5266-1. It uses high-precision infrared technology for reliable obstruction detection. Please note, these are not compatible with openers made before 1997 or brands outside the Chamberlain system (like Genie, Linear, Allis).
For Genie and Overhead Door Openers:
For Genie and Overhead Door systems, specifically those manufactured after 1993, you'll need a different set. The Garage Door Sensors, Replacement for Genie/Overhead Garage Door sensors, GSTB-R STB-BL are compatible with models like the Genie 7155 Stealth Drive Connect and Genie 2055 QuietLift 550. These feature a patented safety beam designed for quick reaction times. Alternatively, the Garage Door Sensors for Genie/Overhead, Garage Door Sensor GSTB-R STB-BL Compatible with Genie/Overhead Garage Door Opener Made After 1993 offers universal compatibility for Genie openers made after 1993, coming with brackets and an easy to follow manual for quick installation.
Sensor replacement usually costs between $30 and $60 for the parts themselves. Installation is straightforward for most DIYers, often taking less than an hour.
DIY vs. Professional Repair Costs in 2026
Understanding how do you align the sensors on a garage door can save you significant money.
- DIY Cost: If you only need to adjust the sensors, the cost is $0. If you need to replace them, parts typically cost between $30 and $60. Your time is the only other investment.
- Professional Repair Cost: Hiring a professional technician will incur a service call fee, which typically ranges from $75 to $150 in 2026. Labor to diagnose and align or replace sensors might add another $50 to $100. While the part cost for new sensors is similar, professionals may mark up the price. Overall, you could expect to pay anywhere from $150 to $300 for a professional to handle a sensor alignment or replacement.
"Safety sensors are a critical, federally mandated feature," explains Patricia Webb, owner of Chen's Garage Door Repair. "Ensuring they are properly aligned and functional protects people, pets, and property. A quick visual check and adjustment can save a lot of headaches and potential accidents, but knowing when to call a pro is also important for more complex issues like wiring or opener logic board problems."
Preventative Maintenance for Your Garage Door Sensors
Once you've mastered how do you line up garage door sensors, a little preventative maintenance can keep them working smoothly:
- Regular Cleaning: Once every few months, wipe down the sensor lenses to prevent dust buildup.
- Keep the Area Clear: Avoid storing items near the sensors that could accidentally knock them out of alignment or obstruct the beam.
- Seasonal Checks: After heavy storms, strong winds, or during seasonal changes, quickly check your sensor alignment as part of your routine home maintenance. Temperature fluctuations can sometimes cause slight shifts in mounting brackets.
- Tighten Mounting Hardware: Periodically check and gently tighten any screws or nuts on the sensor brackets to ensure they are secure.
Knowing how to adjust garage door sensor alignment is a valuable skill for any homeowner. It's a quick, free, and often tool-free fix that can save you the expense and inconvenience of a professional service call.
Upgrade 41A5034 Garage Door Safety Sensor Replacement for Chamberlain LiftMaster Craftsman Openers Made After 1997, Replace G801CB-P, 801CB,
- Incompatible ,, The garage door sensor is not compatible with older Chamberlain/LiftMaster/Craftsman openers Made Before 1997. It is not compatible with brands outside the Chamberlain system, such as Genie, Linear, Allis
- Compatibility ,, The garage door sensors is only compatible with 1997+ openers manufactured by Chamberlain Liftmaster Craftsman. Replaces 820CB , G801CB-P, 2610459, 012381050345, 041A5034, 801CB, 41A5266-1, 041-0136 perf
- Infrared Safety Detection ,, Equipped with high-precision infrared technology, the 41A5034 garage door eyes sensors detects obstructions and prevents garage door accidents. (Tips: No existing sensor system means this par
- Package List ,, Comes with 1 user manual, 1 sending sensor, 1 receiving sensor, 7 wire connectors, 3 wing nuts, and 3 pieces of 1/4-20 inch round head bolts. Each sensor features 19.68 inches wire. (Note: the maximum dis
- Easy to Install ,, Refer to the user manual to finish setup and installation in minutes. Always disconnect power to the garage door opener before installing garage door sensors replacement. If the garage door opener sens
Garage Door Sensors, Replacement for Genie/Overhead Garage Door sensors, GSTB-R STB-BL Garage Sensor for Genie Garage Door Openers Manufactu
- GSTB-R STB-BL Garage door sensor compatible with genie 7155 stealth drive connect garage door opener, Genie 2055 QuietLift 550 Garage Door Opener, genie signature series screw-drive garage door opener, genie wall-mount s
- Why choose our garage door sensor? When your family members or pets accidentally approach the garage door as it is descending, ordinary sensors may react slowly. However, our patented safety beam can trigger the "emergen
- high quality materials: The garage door safety sensor is made of high-strength ABS engineering plastic, which possesses shock resistance and anti-aging properties. Each sensor has undergone strict waterproof, dustproof a
- Installation and inspection steps for garage doors: First, the power supply needs to be cut off. Determine the installation position of the sensor and ensure that the sensor height is uniform. The probe must be directly
- Shopping with no worries: Please note that this product does not come with an installation bracket. If you need a matching bracket, please purchase the "Sensor + Bracket Set". Avoid the situation where the product cannot
Garage Door Sensors for Genie/Overhead, Garage Door Sensor GSTB-R STB-BL Compatible with Genie/Overhead Garage Door Opener Made After 1993,
- Universal Compatibility: GSTB-R STB-BL Replacement for genie garage door sensors, Compatible with all garage door openers manufactured by genie after 1993.
- Easy to Install and Program:garage door sensors Kit with Brackets . A detailed user manual is included to help you get set up and install in minutes. TIPS: Be sure power is NOT connected to the garage door opener BEFORE
- Updated Design: garage door sensors emits an invisible beam of light on the inside of the garage door, whenever there is an obstacle, the garage door automatically reverses before causing any damage to prevent accidents.
- Package Includes: Detailed installation manual *1, Sending sensor *1(with a red LED), Receiving sensor *1 (with a green LED), Wingnut *4 and round head bolt *4.
- high quality After-sales Service: Our products provide a one-year warranty service, no matter for any reason you are not satisfied, please write to us, we will provide you with timely service. Note: Accessories are compa